Get your own badge! (Part-1)

Recently, Week-2 of GSoC 2016 concluded when my mentor asked me to setup the main repo with integration tools: ravis-ci, landscape.io (linting), coveralls (code test coverage),  readthedocs and add badges for each of them.

My first response was, What are badges? This are markups provided by the integration tools showing corresponding score or stats, supposed to be added to Readme.md file of your repository. Rest of the blog is on how to get one for your own-repo.


Travis-CI:

Travis-CI is an integration tool which tests and deploys your code everytime you make any commit for all your branches and pull requests as well. The tests are run according the script provided by you in .travis.yml under your branch.

Setting it up is quite easy. Head to the website travis-ci.org. Sign Up using your Github Account and follow the instructions to link your repo. Remember to switch-on your main repo at your travis account. You can modify switches to your different repos anytime by accessing your profile at travis-ci.org. Straight-forward guides for writing script file .travis.yml in almost all languages are provided by travis-ci.org here.

After Travis-Ci integration is over, sign in in your travis-ci account. Select your main repo from the left panel. You can see the badge next to your repo’s name like this.

Untitled.png

Click on the badge. Select your main branch and ‘Markdown’. Copy the link provided to your Readme.md file to get the badge on your main account.


Landscape(Linting):

After every code push, Landscape runs checks against your code to look for errors, code smells and deviations from stylistic conventions. It finds potential problems before they’re problems, to help you decide what and when to refactor.

To help you setup, everthing is documented here. Add the repository you want to perform checks on.

After setting up, go to your dashboard by logging into landscape.io account, Click  on your repository. Badge will show up on top right corner as below.

Untitled.png

Click on it and copy the markdown link into Readme.md file of your repo to get the badge on github.


Part – 2 will contain setting up of coveralls and readthedocs will be posted soon!

The first merge to main branch!

I spent the previous two days making changes in the Interfaces for ports and trying to resolve all the errors in being able to instantiate the GEMAC core remotely using the interfaces. And finally I merged my first pull request from the dev branch into the main branch yesterday, after getting review from Tom Dillon and Christopher Felton. It feels good to get started!

Well to test the instantiation I started to look up PyTest and was able to instantiate the core using interfaces after solving lot of import module related problems.
One thing i learnt which shall be useful for others is when you use ‘py.test’ in the command line to run all the tests, the current directory from where you are calling is not included in the pythonpath if its not explicitly mentioned, which can be a problem if you are still developing the core and havent installed the package yet or the changes are very frequent requiring you to update the installation of package everytime. A simple solution to this being calling the tests using ‘python -m pytest’ which searches the current directory and sub-directories as well for the modules.

Now, I am working on including the FIFOs somewhere between host-client interface, which which will play important part in providing features for Flow Control ; and than develop tests for the top-level modules.

GSoC : Week 1

So the first week of the coding period got over and time seemed to flyby while I tried to understand the working of GEMAC so as to decide the required interfaces and transactors of the module structure as proposed in the GSOC proposal. After discussion with my mentor Tom Dillon, we came to a conclusion to to use a subset of interfaces for 1-GEMAC as defined in Xilinx-UG144. The subset excludes the statistics vectors in the Core interface with Optional Management Interface, Page 23.

Also, After a little research I found out that the Spartan-3E Starter board would not be sufficient to test the implemented core as the SMSC LAN83C185 Ethernet PHY present on the board can support only up-to 100 Mbps as opposed to 1 Gbps which we wish to test. As a result, I shall need to lookup other hardware options which I would do in the latter phase of the GSoC.

After deciding up on interfaces I started to make up a basic modular structure of the core to be implemented and committing in the dev branch of github repo.

Further, I plan to complete the work above within a day or two and make some changes as suggested by Christopher Felton on the PR to the main branch, so I can start developing tests.

GSOC 2016 starts off!

Yay Readers! Glad to inform that I have been selected in the program Google Summer of Code 2016. I will be working with the sub-org MyHDL which comes under the umbrella of Python Software Foundation(PSF). The project proposal is to design and test Gigabit Ethernet Media Access Controller (GEMAC) core in MyHDL using Python. The GEMAC is a communication core commonly used for streaming data coming from Transmitter and Receiver client interfaces to the Field Programmable Gate Arrays (FPGA). The purpose of the project is to create a design that can be easily used and understood by any endpoint user. This project proves the capability of MyHDL to create user friendly versions of hardware system designs. This project is important because it demonstrates the use of advanced software technologies applied to hardware design. If you wish you can go ahead and check my complete project proposal.

I should use this space for status updates of my project. The blog is intended to be addressed to the beginners in the field of FPGA programming so they can learn alongside me and to my mentors for evaluation purposes. So this post comes at the time when the bonding period (April 23, 2016 – May 22, 2016) has just ended, during which we were supposed to, using help of our mentors, get all prepped up for the upcoming intense 3 months of coding the summer out.

UPDATE TILL NOW:

I have setup my Windows 7 PC with the following.
– Python 3.5.1
– MyHDL version 1.0-dev (Install guide)
– Eclipse IDE for Python
– Xilinx ISE Webpack for Verilog / VHDL

I will be using Xilinx Spartan 3E Starter Kit for hardware testing and verification. So during the bonding period I got my hands on the kit and implemented basic logic gates using Verilog in Xilinx ISE to just familiarise myself with the basic hardware.

After that I started looking for some resources to get little insight into GEMAC core. I found Xilinx 1-Gigabit Ethernet MAC DS200 datasheet which defines the modules and interfaces of the core implemented by Xilinx. Moreover I used the reference HDL (test_gemac) from GnuRadio USRP Project referred by Christopher Felton, one of my mentors for the GSoC programme for getting help towards understanding the implementation of cores and I shall use this further during the coding period to continuosly compare the core which shall be developed by me in MyHDL. This online Verilog tutorial helped a lot to get familiar with basic syntax of Verilog while going through the reference code.

FURTHER:

So, the coding period starts today and now we are supposed to give it all in and code.
For the next week I plan to define the interfaces and transactors and start developing the basic modular structure of top level sub-modules using the test_gemac repo and Xilinx_DS200 datasheet.


RSS Feed for subscribing: https://ravijain056.wordpress.com/category/myhdl/feed/

IRC – The Coder’s Whatsapp

IRC (Internet Relay Chat) is a forgotten mode of Communication used widely during the 90s with the advent of Internet. Now it is losing its grip over the userbase as more modern and less complicated models of communication are taking its place(Whatsapp etc).

Well actually it really makes  a coder want to communicate through IRC for various reasons like to stand out from the normal dumb crowd and look cool. So here is a short tutorial for the coders out there to join their first channel and get started to look cool.

First of all you need a client(application) that would help you get connected. There are many out there, as a simple google search would reveal. Personally, Nettalk is one of good ones out there which you can get from here. For the Android Users, AndroIRC works fine too and is very similar to set up too.

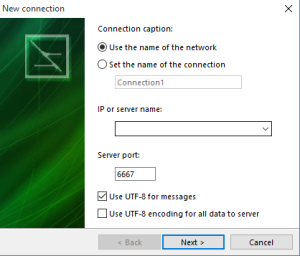
Once you get it installed start the application. First thing and the only complicated thing you will need to do is add the server. Click on the new button on the top left corner for the same. A dialog-box like the one below would appear :

1

Fill in the Server name as “irc.freenode.net” without the quotes and the server port as 6667 and click next.
Next fill in your NickName which shall be the name that would be visible to others and click next and complete.
If it shows “Connect…OK”, Kudos you just completed adding the server else check your network connection and try again.

Now comes the part when you join the channel(group). For that you would need to enter the following command in the white box in the bottom :
–  /join #<channel_name>
For eg: “/join #drishti” without the quotes.

Once successfully joined you can start having your world changing discussions on the channel through the same white box.

Once settled you can look forward to other things like getting your nickname registered, starting your own channel, etc. for which a simple google would be sufficient or you can ask us on channel #drishti.

Hope to talk to you in IRC (nick:Raun) ..:)

Programming a microcontroller

Its easy to get started, programming a micro-controller , if you know a programming language like c/c++ well.

Every micro – controller has its own specifications and architecture mentioned in the datasheet which is always available along with it. Few simple things to understand while learning to program a micro-controller.

1. Pin Diagram – Every micro-controller have its own unique pin diagram. It states what the pin use is for. As you can see from the below pin diagram(Atmega32), generally there is some function associated with each pin. Each port pin can either be used as input/output or for the function associated with it (for eg: interrupt(INT0)). Atmega32 pin diagram

2. Registers as state variables- They can be considered analogous to the global state variables. Only difference being, some of it are controlled by the programmer and others by the micro-controller itself(for storing output of some results or similar reasons). This is the only major difference in programs for a micro-controller compared to programs in a general computer.

As stated above a pin can function in multiple ways. We can choose the same by setting appropriate values to the registers. The datasheet contains all the information about the values of registers needed to be set for using pins for different functions. For example, for using the PORTB as output, we need to set the Data register DDRB to (11111111) .

3. Logic – After defining the state of the micro-controller all you need to do is apply your logic by simply following the program syntax in a IDE like AtmelStudio,etc.

The topics to cover and few exercises are given in this pdf. Go through it and try and finish the exercises by this month. The key skill required to excel in this field is to know how to read a datasheet of a micro-controller well. This book should also help you to understand AVR better. The Robotics Journey page should also help with getting started.

Also for further discussions and problems you face while solving the exercises in the given pdf, you people can join drishti-dev@googlegroups.com and post on it.

Summer Project – MyHDL

For people who dont know about HDL(Hardware Description Language), it is a computer language facilitating the design and simulation of electronic circuits, mainly digital logic circuits (eg: Flip Flops, RAM, etc). VHDL and Verilog are the industry standard HDLs. MyHDL is a free, open-source package for using Python as a hardware description and verification language. Its goal is to provide the high-end features of Python to the hardware designers. More information on MyHDL can be found here.

MyHDL also looks to provide support for conversion of code written using MyHDL to VHDL and Verilog for the convenience of hardware designers so they can integrate their work seamlessly. An example of code written in MyHDL and the converted code can be found here. My summer project aims towards adding 2D List Conversion Support to this suite. You can have a look at the project proposal for detailed description of my project.

Currently i am trying to figure out how MyHDL actually works from inside. After little tracing of the flow of basic D Flip flop program, I managed to understand to some extent working of a very basic component of MyHDL, Hierarchy Extractor. It uses help of profiler (sys.setProfile(func)) to get the hierarchy of the source code under simulation. I target to understand the working of simulation and conversion of the basic DFF program by end of this week(31/5/2015) and post the summary regarding the same.

Summer guide for the 2nd years

Hello people, hope you are enjoying your vacations.

Its been around two weeks since the vacations have started and we have almost two months before the start of the new academic year. The things to do are lot. Its time everybody start to make plans to develop themselves to do wonders next year. Here is the basic guide for things to do in Summer(other than enjoying with your family/friends), for a smooth journey in the upcoming year.

First of all lets get clear on some basic requisites i think is necessary for the upcoming year:

1. Photoshop / Video Editing Skills – This is a basic requirement as presenting your idea is as much important as to implement your idea. It is not necessary to know Photoshop / Video editing skills on a professional level but basics would suffice so that your ideas can be at least conveyed to the outside world.

2. Blog – We here at DRISHTI believe in sharing the knowledge. What better place than blogs to express and pass on your knowledge and experience. Also blogs would be an essential tool in the upcoming year for keeping the DRISHTI team updated with the status of ongoing projects. So it is expected that everybody get their blogs ready and start posting updates on whatever you are learning or working on by end of June.

3. Gmail (Google Groups) – The google groups are supposed to form pipeline for discussion forums where the inclusion of seniors would bring in much required guidance from the experienced. This is something for which you people wont need to drop a sweat for because well everybody on the planet have got a Gmail account(not literally). Well if you haven’t got it yet, Get it asap(GOD HELP YOU!).

4. Github – For those who don’t know what Github is, its an online platform that hosts open source projects. The plan for the upcoming year is to use this platform for the software development stages. So set up a account on Github, understand how things work there(push-pull concept). For a start, fork my repository and start performing little experiments.

Now lets get a look on technical aspects:

First Month : Learn Basics – Explore different paths – Choose your major development area for the next year.

Second Month : Work on the selected major development area thoroughly.

Practical : Getting hands-on experience and working on small modules with us would be essential on getting the confidence for the further journey.

Basics:

AVR programming – This would serve as a basic implementation tool to help you get settled in the world of engineering. I would be posting on how to get started and good sources on internet, also sharing a bit of my viewpoints soon.

Logic building – I suppose everybody is familiar with at least one programming language. A good place to build your logic would be codechef. Try and solve as many problems as you can. I suggest to set up a weekly target to solve a minimum number of problems(do take it seriously). This would be a very important building block as creating logic is basic requirement of everything around. A course on Coursera – ‘From NAND to TETRIS I’ would also be good and it would help you with college studies too.

Major Development Areas :

1. Communications : Simple task on first look, Transfer Data from one place to another(or interrupt one :P); gets daunting as you get deeper(security, multiplexing). No doubts, these people would be responsible for all the data sweeping around from one place to another, but also, this time we seek to give them space and bring in new technologies (or build some) and develop them.

2. Controller Development : These people will have one basic aim : ‘Make the life of operator easier’. Starting with trivial controllers like PS2, etc. and then Exploring technologies like voice-control, gesture-control, etc.

3. Image Processing : Enough said. Comprehending images into process-able data. There are lots of levels of image processing. Here at DRISHTI, it still being on development stages would play a key part in building dynamic projects.

4. App / Software Development : The end-user care-takers. Most of the projects would rely on these people for developing the user interface making it comprehensible as well as usable for the end-user.

5. Control Systems : These people would be the ones controlling the systems so as to work together and bring desirable output. A simple example, Run  the two motors of a simple  two-wheel bot in sync so as to move the bot forward in straight line, a simple task in theory, very tough to implement(experience speaking :P).

6. Machine Learning : The word sounding good and heavy is very new and vague to us indeed. In the upcoming year, these people would try to bring in this powerful modern concept and revolutionize the way things work around.

The above listed major development areas are the ones i think would be necessary. You people can always bring in new areas if you wish. Google and books(i prefer books) are always the best place to learn anything. Other than that Online courses on Coursera, Udacity, etc. would be great place to learn on some areas namely, Image Processing, App/Software Development, Machine Learning. For control systems, i would suggest referring Control Systems Engineering (Nagrath and Gopal), it would help you in college studies as well. If you people get some good sources please do share them in the comment section.

Lastly, the most important of all, stay in contact with seniors as well as other teammates and keep them updated with your status.

PS: People interested in Web development, please contact me.

– Ravi